LESSON PLAN:
A Looong Way From Home: A Hands-on Geography Lesson About WWII
World War II was truly a global conflict. Nearly every country in the world was affected. More than 100 million soldiers fought on three continents and on all of the world’s oceans. At least 70 million people—mostly civilians—died, making WWII the deadliest war in history.
Young men and women from the United States were sent all over the world during WWII. Many fought in places that they had heard of, but had never seen: The Philippines, France, Germany, and Italy. Many fought in places that they had never heard of before the war: Guadalcanal, Iwo Jima, and Kasserine.
With so many soldiers serving so far from home, Americans had to learn the geography of the world if they wanted to know where the fighting was and where their loved ones might be. People taped up world maps on their living room walls and used them to follow the course of the war as they listened to wartime radio reports or read newspaper stories.
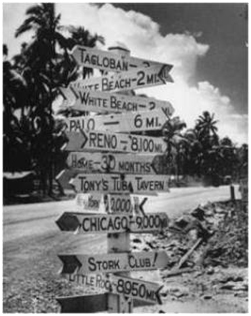
For the soldiers in far off places—many away from home for the first time in their lives—any reminder of home was a comfort. In 1942, while building the Alaska Highway through the vast Yukon Territory, a homesick soldier, Carl K. Lindley, erected a sign pointing the way to his hometown of Danville, IL. On the sign, he included the distance—2,226 miles! Other soldiers served even farther away. On Leyte Island in the Philippines, soldiers were as much as 10,000 miles away from home. Direction signs like these were a common sight wherever U.S. soldiers served during WWII. These signs served as small reminders of home—reminders of what we were fighting for.
Objective:
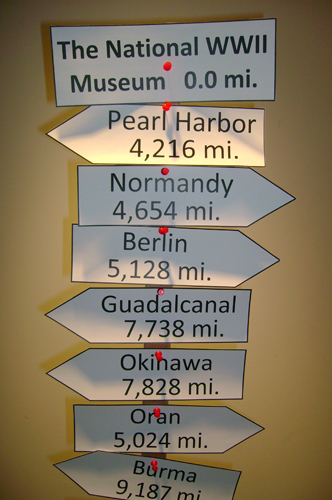
Students will create a direction sign pointing the way to and describing important WW II locations.
Grade Level: 5-12
Standards:
History Thinking Standard 4—the student conducts historical research by obtaining data from a variety of sources. History Thinking Standard 5—the student engages in historical issues-analysis and decision-making while identifying issues and problems in the past.
Content Era 8 (1929-1945), Standard 3B—the student understands World War II and how the Allies prevailed.
Time Requirement: Two to three class periods
Materials Needed: Computers with Internet access, printer, card stock, scissors, thumb tacks, hammer, nails, saw, and lumber (1 six- foot 2x2, 1 six-foot 1x2)
Download a printable pdf version of this lesson plan
Directions:
Step 1: Researching a WWII Location
Alone or in pairs, assign students to select one WWII location from the list below. Students will then conduct research on that location using available classroom, library, and/or Internet resources. Students should take notes as they conduct their research. You and your students can add other WWII locations if you wish.
Example Locations:
Alamogordo, NM |
Kiska, AK |
Peking (Beijing) |
Amsterdam |
Leningrad |
Port Chicago, CA |
Anzio |
London |
Rome |
Auschwitz |
Madrid |
Saipan |
Bastogne |
Manzanar |
Singapore |
Bataan |
Moscow |
St. Mere Eglise |
Berlin |
Nagasaki |
Stalingrad |
Brisbane |
Normandy |
Tokyo |
El Alamein |
Oak Ridge, TN |
Torgau |
Guadalcanal |
Okinawa |
Tuskegee, AL |
Hiroshima |
Oran |
Vichy |
Iwo Jima |
Paris |
Washington, DC |
Kasserine Pass |
Pearl Harbor, HI |
Yalta |
Step 2: Writing a Description of the WWII Location
Students will write a short description of their WWII location and what happened there during the war. This description should be no more than 50 words. As students will be limited in their descriptions, they will have to choose carefully the facts and words they include.
Step 3: Determining Distance
Students will determine the distance between their city or town and their WWII location. This can be done by using the Daft Logic Google Maps Distance Calculator site http://www.daftlogic.com/projects-google-maps-distance-calculator.htm and following the simple directions below. Decide ahead of time if you want students to determine distances in miles or kilometers.
You can use the Google Maps Distance Calculator to find out the distance between two or more points anywhere on the earth. In other words, the distance between A and B. Click once on the map to place the first marker and then click again to position the second marker. The distance between the points will then be displayed.
How to Use:
1. Zoom and drag the map to find the location of marker 1
2. Click to place marker 1.
3. Zoom and drag the map to find the location of marker 2.
4. Click to place marker 2.
5. The distance will be displayed below the map in miles or kilometers. You can change between miles or kilometers at any time.
6. You can also drag and drop markers after they have been put on the map
Step 4: Creating Direction Arrows
After students have composed their WWII location descriptions and determined the distances to those locations, they will create their sign post arrows.
Directions:
1. On the computer, open a blank text document.
2. Turn the Page Orientation to Landscape.
3. Insert an arrow shape (see below) and make it stretch across the page.
4. Insert a text box inside the arrow and type in your location and the miles.
5. Insert another text box below the first and type in your location's description.
6. You can add color to your text, if you wish.
7. Print your arrow out on a sheet of card stock and cut it out.
IMPORTANT: For locations in the Pacific, Asia, and points west, be sure to use a left-pointing arrow. For locations in Europe, North Africa, and points east, be sure to use a right-pointing arrow.
Don't have enough computers in your classroom? Print out and copy arrow templates on card stock and let your students write out their direction arrows.
Sample arrow:
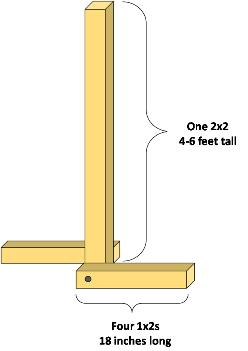
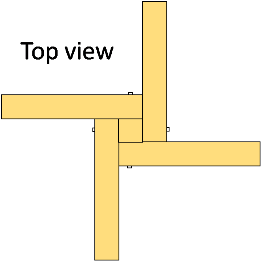
Step 5: Building the Sign Post
This lesson will require the following supplies:
- One 2x2 board, 4 to 6 feet-long
- One 1x2 board, cut into 4 equal-sized pieces
- A saw
- 4-8 three-inch nails
- Hammer
- Thumb Tacks
Consult the diagrams below to construct your sign post. Please be sure to provide appropriate adult supervision if students participate in the construction. Feel free to use a different building method, if you wish.
Diagrams:
Next, have your students affix their arrows to the sign post with thumb tacks. You can add a title sign with your school's name on top.
Once you've built your sign post, you can use it for each of your classes if you wish. Just remove one class's arrows and add the next. Don't forget to take a picture of each class's sign post before you dismantle it.
(If you don’t have the supplies to build a sign post, you can simply create a paper sign post for your bulletin board and affix the arrows to it.)
Step 6: Hold a Class Discussion
Have students describe to the class their WWII locations. Have them point them out on a world map or globe. Hold a discussion with your students about what they have learned:
Were you surprised at the distances to your WWII location? Why or Why not?
Why do you think soldiers during WWII put up this type of signs all over the world?
What other ways do you think soldiers kept up their morale?
If you were in charge of morale, what would you do for the soldiers?
Have you ever felt homesick? What did you do to make yourself feel better?
What did you learn from this lesson?
Step 7: Share Your WWII Sign Post with the World
Email photos of your sign posts to The National WWII Museum and we will display them on our web site.
Feel free to adapt these instructions to best fit your students’ level and your classroom resources.
Assessment:
Components for assessment include individual student research, participation in construction, and class discussion.
Enrichment:
Students may choose one of the locations and research it further. They may also create a facsimile of another World War II artifact.
Email photos to ww2projects@nationalww2museum.org. Please include teacher name, school name, city and state, grade, and subject of your class.
Download a printable pdf version of this lesson plan
TAKE ACTION:


EDUCATION PROJECTS:
Student Travel – WWII Educational Tours
High school and college students, learn the leadership principles that helped win WWII on a trip to France or during a weeklong residential program in New Orleans. College credit is available, and space is limited.
See You Next Year! HS Yearbooks from WWII
Collected from across the United States, the words and pictures of these yearbooks present a new opportunity to experience the many challenges, setbacks and triumphs of the war through the eyes of America’s youth.
The Victory Gardens of WWII
Visit the Classroom Victory Garden Project website to learn about food production during WWII, find lesson plans and activities for elementary students, get tips for starting your own garden and try out simple Victory Garden recipes!
The Science and Technology of WWII
Visit our new interactive website to learn about wartime technical and scientific advances that forever changed our world. Incorporates STEM principles to use in the classroom.
Kids Corner: Fun and Games!
Make your own propaganda posters, test your memory, solve puzzles and more! Learn about World War II and have fun at the same time.
